

Что такое пульт управления промышленным роботом?
Каждый, кто работал на заводе в течение какого-то времени, практически наверняка видел такую картину: оператор держит в руке устройство, похожее на «пульт дистанционного управления», и, глядя на робота, слегка перемещает его в пространстве. Это устройство на самом деле является центральным «интерфейсом взаимодействия» с роботом — пультом программирования.
Многие люди, впервые сталкивающиеся с промышленными роботами, задаются вопросом: что это за устройство? Почему без него невозможно выполнить множество операций? Мы обычно работаем с комплектующими таких брендов, как FANUC, ABB и KUKA; пульт программирования считается наиболее распространённой, а также одной из самых уязвимых деталей. Используя его длительное время, вы понимаете: внешне он выглядит просто, но на самом деле играет чрезвычайно важную роль. 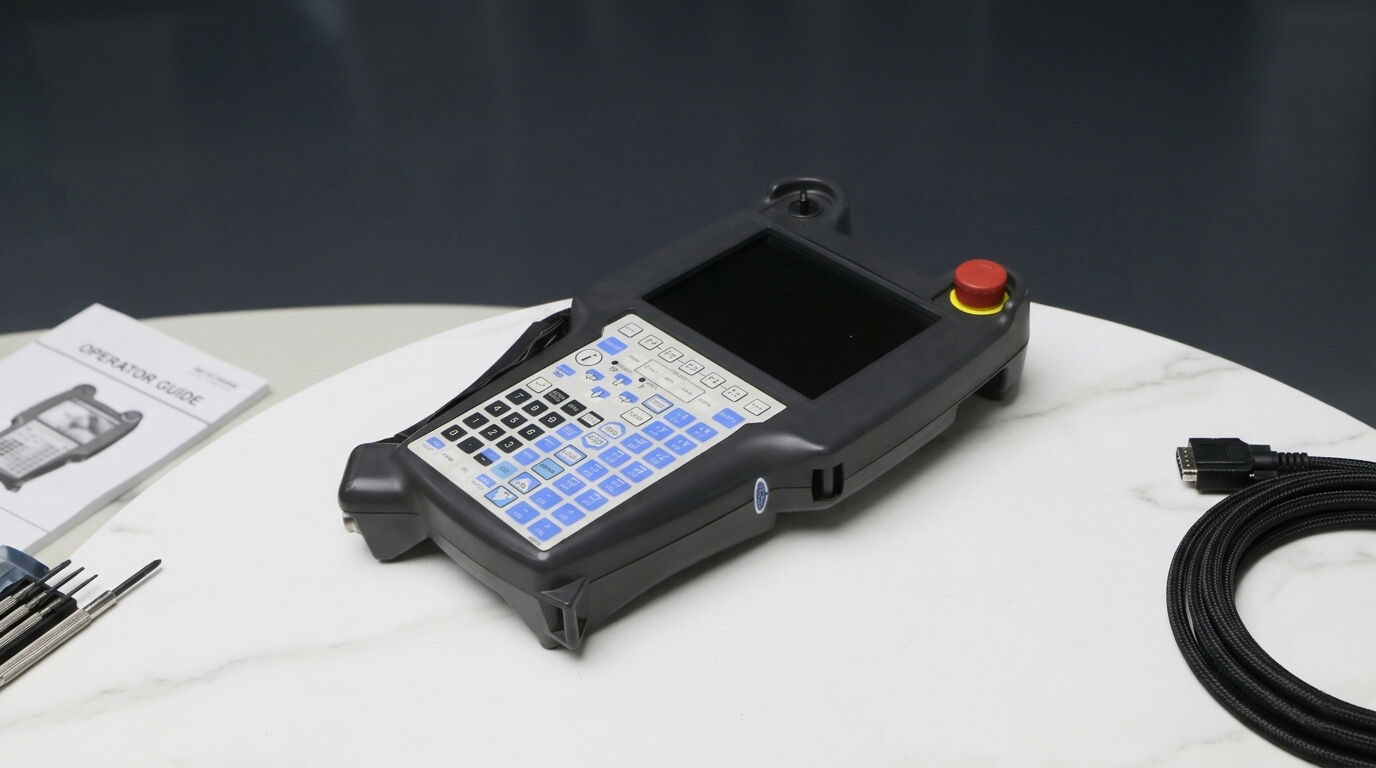
Что такое пульт управления промышленным роботом?
Проще говоря, пульт программирования — это инструмент, с помощью которого вы «общаетесь» со своим роботом.
Вы можете рассматривать его как трёхфункциональное устройство:
* Пульт дистанционного управления (для управления перемещениями робота)
* Инструмент программирования (для написания программ)
* Просмотрщик ошибок (для отображения аварийных сообщений)
По сути, как только речь заходит о наладке нового оборудования, корректировке траекторий, профилактическом обслуживании или устранении аварийных сигналов — без этого не обойтись. У некоторых заказчиков сломанные станки-тренажёры вызывают первую реакцию: «Можно ли пока продолжать работу?». На самом деле во многих случаях оборудование сразу же полностью выходит из строя, особенно если требуется изменить программу.
Что оно может делать на практике?
Слишком абстрактно рассуждать теоретически, поэтому перейдём сразу к наиболее распространённым вариантам применения на производстве.
1. Самое распространённое действие: режим «Jog» (пошаговое перемещение)
При первоначальной настройке робота первым шагом всегда является его медленное перемещение.
С помощью пульта управления вы будете перемещать отдельную ось (например, только J1 или J2) на небольшие участки, чтобы найти опорную точку. Этот этап чрезвычайно важен, особенно при выравнивании приспособлений, задании траекторий сварки и определении точек загрузки/выгрузки. Многие проблемы с точностью на самом деле возникают именно из-за недостаточной корректировки на этом этапе.
2. Написание программы: на самом деле многим людям обучают
Теоретически вы можете напрямую писать код, однако на практике многие программы записываются в процессе перемещения робота.
Процесс, скорее всего, заключается в том, чтобы переместить робота в определённую точку, зафиксировать её положение, затем переместиться в следующую точку и в итоге составить траекторию движения. Именно поэтому данное устройство называется «учебным пультом управления». Например, учебный пульт управления FANUC позволяет многим операторам выполнять программирование непосредственно с его помощью — для этого не обязательно использовать сложное программное обеспечение.
3. Проверьте сообщения об аварии — как правило, это первое, на что следует обратить внимание!
Как только оборудование останавливается, полевой инженер в первую очередь должен посмотреть не на электрический шкаф, а на экран учебного пульта управления. На нём отображаются код аварии, информация о неисправности, текущий статус и сигналы ввода/вывода (I/O). Многие проблемы, по сути, можно диагностировать именно здесь.
Системы безопасности: это то, что легко упустить из виду!
Обычно на демонстраторе есть две ключевые вещи: красная аварийная кнопка остановки (E-stop) и трёхпозиционный переключатель включения (Deadman) на задней панели. В частности, «переключатель включения» — это то, к чему многие новички не привыкли.
Для того чтобы робот мог двигаться, его необходимо нажать в центральное положение:
* Отпустить → остановка
* Сильно сжать → также остановка
Это на самом деле очень удачное решение, предотвращающее неправильное использование.
При разборке оказывается, что он состоит всего из нескольких деталей.
У разных брендов внешний вид различается, однако конструкция в целом практически одинакова.
- Экран
У новых моделей, как правило, уже сенсорные экраны, однако на старых устройствах по-прежнему используется множество кнопок + небольшой экран. На нём можно просматривать программы, координаты, аварийные сообщения, статус системы.
- Область кнопок
Это одно из самых уязвимых мест. Ежедневно вы нажимаете клавиши со стрелками, функциональные клавиши и цифровые клавиши. Со временем довольно часто возникает неисправность кнопок.
- Кнопка аварийного останова
И без слов ясно: безопасность превыше всего.
- Включаемый переключатель на задней панели
Этот элемент часто упускают из виду, однако при его неисправности робот не будет двигаться.
- Кабель (многие игнорируют его важность)
Честно говоря, по нашему опыту технического обслуживания, наиболее вероятной причиной выхода из строя пульта управления (teach pendant) является не экран, а кабель. Причина предельно проста: кабель ежедневно тянется, изгибается вперёд-назад, подвергается давлению и зажиму. С течением времени это приводит к обрыву внутренних проводов и ухудшению контакта.
Как осуществляется связь с роботом?
Это очень простой процесс:
1. Вы нажимаете кнопку действия на пульте управления (teach pendant).
2. Сигнал передаётся в контроллер.
3. Контроллер выполняет расчёты.
4. Робот выполняет команду.
5. Затем вы получаете результаты обратно.
Все это происходит в режиме реального времени. Таким образом, если возникает проблема с передачей данных, это, по сути, ошибка.
Разные бренды выглядят по-разному
У каждого производителя своя конструкция, например:
* FlexPendant от ABB
* Teach Pendant от FANUC
* smartPAD от KUKA
Если вы будете использовать его в течение длительного времени, то заметите, что логика работы существенно отличается, особенно структура меню и метод программирования.
Многие пользователи испытывают затруднения: пульт программирования (Teach Pendant) против контроллера (Controller) против операторской панели (Operator Panel)
Кратко поясним различия:
* Пульт программирования (Teach Pendant): удерживается в руке (программирование + управление)
* Контроллер (Controller): «мозг» станка (расположен в электрическом шкафу)
* Панель операторского интерфейса (HMI panel): закреплена на станке, служит интерфейсом для оператора
Основные особенности пульта программирования — гибкость, мобильность и возможность прямого управления роботом.
При выборе или замене следует обратить внимание на несколько подводных камней
Именно здесь мы часто сталкиваемся с тем, что клиенты попадают в ловушку:
* Модель должна точно совпадать (нельзя просто заменить)
* Версия контроллера должна соответствовать
* Тип интерфейса должен быть одинаковым
* Длина кабеля должна быть подходящей
Некоторые клиенты приобретают неподходящую модель и подключают её напрямую, однако связь отсутствует.

